Showing posts with label Operating System / Computer. Show all posts

Friday, January 20, 2012

Problem with internet dial-up connection


When you are browsing your favorite websites using dial-up internet connection, your incoming calls can create problem with your modem if the call waiting option in your modem sittings is enable. Your modem may be hangs up and disconnects the internet connection frequently. Normally when you disabled the call waiting option in your modem sitting and any body tries to call you, he will get the busy beep during internet connected. You should always disable the call waiting option to avoid modem disconnectivity or hangs up.

  • To disable the call waiting option, first click on Start button, then Network Connections.
  • Here double click on your internet connection and click on Properties button then General.
  • Under General tab select Use Dialing Rules box then click on dialing rules button.
  • Here select My Location then click on Edit button. Under General tab select the option To disable call waiting dial and put any number in next box like *32.
  • At the end click on Ok button and dial your connection again.

Thursday, January 19, 2012

Optimizing Windows Speed


How to optimize the Windows performance by removing unwanted programs from startup using windows registry. Applicable to Windows XP, Vista, Windows 2000, windows 98 and windows server.
I will start hacking tips with a very useful and easy to do job. Most of us face this problem of computer slowing down; windows operating system takes ages to load when started, windows explorer hangs up and also how to find out whether your computer is infected.
Follow these steps:
1. Start and click on run in case of windows XP, Server, windows 98, and 2000 but in vista type directly in search box.
2. Type Regedit in the run box to open registry editor.
3. Go to file menu and click on export to create a back up of registry, save it on your drive other than your default windows directory.
Find out the current programs which are starting up with windows
After opening Registry editor click on HKEY_LOCAL_MACHINE
Software\
Microsoft\
Windows\
Current Version\
Run
You will see something like this on right hand pane in your registry editor
Now it’s time to get rid of the programs those slow down your operating system and possible may be a Trojan horse hiding in your hard disk.
Right click on any program to delete the entry, which you don’t want to be loaded during startup; personally I would only keep anti virus program entries.
Now you can repeat the same process with HKEY_LOCAL_USER entries and keep only Cftmon.exe for your computer sound to be working.
After deleting the unwanted program registry entries, restart the system and feel the difference in speed. If you are confused about which entries to be deleted from registry editor or want to know whether it’s a Trojan or useful program.

Improve Your Computer’s Performance


Tips for Speeding Up Your PC
Few things are as frustrating as dealing with a slow, sluggish computer. When a computer is brand new, it works wonderfully well. Over time, though, its performance can slowly begin to worsen.
This happens for a number of reasons, but the biggest culprits are things like spyware, adware and other computer threats that are unwittingly downloaded along with other content while online. You don’t have to download thousands of MP3s, movies or other items to experience these problems, either – nobody is immune to them. Instead of accepting the situation, there are plenty of techniques and strategies that you can use to make it better – a few of the best ones are outlined below.

 *1: Clean Your Computer’s Windows Registry

The biggest cause of slow, sluggish PC performance is errors and problems within its Windows registry. Adware, spyware and other threats usually target the registry, damaging or misplacing important files within it. When it comes to PC cleaning, a daily Windows registry cleaning should be at the top of your list of priorities. However, this should never be done manually – there are too many opportunities for major errors that could seriously damage your PC’s operating system. Instead, invest in a high-quality Windows registry cleanup program and configure it to run once per day – you won’t believe the difference that it makes.

*2: Remove Unneeded Files

Every time you log on to the Internet or otherwise use your computer, temporary files are generated. They are usually only needed once; however, they don’t disappear on their own. Instead, they accumulate over time until they are cluttering up your computer’s file system and affecting its performance. While it’s possible to remove these files one-by-one, it’s much easier and quicker to use a PC cleaning tool that’s designed for the purpose. Try to do so about one time per week to keep your computer humming along with ease.

*3: Remove Unneeded Programs

Like many people, you probably download and try out many different programs each month. How many of them do you actually end up using on a regular basis? Chances are, not very many of them. By getting into the habit of uninstalling unused and unneeded programs, you can keep your computer’s file system a lot less cluttered. In turn, your PC’s performance will improve dramatically. You can optimize your computer in this way by using its Add/Remove Programs feature. Its location varies by operating system, but you should be able to find it somewhere in the Control Panel.

*4: Empty the Recycle Bin

When you click “delete” on a file or a program, it doesn’t go away for good – not immediately, anyway. Instead, it sits in a kind of purgatory in your computer’s Recycle Bin. As things pile up in the Recycle Bin, your computer can start exhibiting some very annoying problems. If sluggish startups and frequent crashes are occurring with increasing frequency – and your computer’s recycle bin is very full – go ahead and empty it. From then on, get into the habit of doing so about one time per week. This small but important strategy can make a huge difference.

*5: Perform a Disk Defragmentation

Windows isn’t very efficient when it comes to storing files. It actually splits them up, depositing them into whatever spaces are available. The more spaced apart the pieces of a file are, the harder your computer has to work to make them run. The Windows disk defragmentation system tune-up utility works to piece all of those files back together again. The process is a long one, though, and only needs to be done about four times per year. Set it up to run automatically once every three months. By doing so, you’ll be able to keep your computer running in tiptop shape.
When it comes to keeping your computer running optimally, small but regular maintenance is the best way to go. Protecting your PC only does so much; even the most careful Internet users in the world unintentionally download malicious software from time to time.
By using basic system tune-up tools, cleaning your computer’s Windows registry regularly, performing regular file-cleaning maintenance and otherwise optimizing your PC, you should be able to keep it in like-new condition for a lot longer. Even if your computer has been performing slowly for some time, beginning this regimen is sure to produce results. In the end, you’ll be able to enjoy a computer that flies along – instead of one that spins its wheels.

Disabling Windows Vista and 7 Login at Startup


When you start your Windows Vista or Windows 7 computer, by default the system makes you enter your password to log in. Here’s a way to get around it.
When you first install Vista or 7 and start using it, you are required to enter in a password for your account. But after that, you’re not really given a choice to remove the password if you don’t want it. You’re just sort of stuck typing it in every time and that can get old rather quickly!
If you’re not the only one who uses your computer, consider leaving it this way. It is a good security feature and it helps to keep all of the different accounts, files and preferences separate from each other. But if you’re the only one who ever uses your computer, you should be able to get rid of the password prompt if you want.
If you’d like to bypass the Windows Vista and 7 log on process and remove your password, just follow these steps:
  1. Go to Start, Control Panel.
  2. Click on the User Accounts and Family Safety link.
  3. Next, click on the User Accounts link.
  4. Under the “Make changes to your user account” section, click on the Remove Your Password link for your account.
  5. On the next screen that comes up, enter in your current password.
  6. Click on the Remove Password button to confirm everything.
  7. Close out of all the open windows and restart your computer. That will allow you to test the system to make sure your password really was removed.
From now on, when you start up your Vista computer, you will be taken to your desktop automatically and you will no longer have to worry about a password.

How to Write-Protect Your USB Flash Drive


Many a time, it becomes necessary for us to write protect our USB flash drive so as to protect it from viruses and other malware programs. Because flash drives are so popular and most widely used to move data between computers, they are the prime target for attackers as a means to get infections spread around the computer world. Also, since USB drive is not a Read-Only Memory (ROM), the data inside it can easily be modified or deleted by malware programs.
But unfortunately, most of the new flash drives do not come with a write-protect feature as the manufacturers wish to cut down the cost of production. Hence, the only way to write-protect your USB flash drives is to enable this feature on your own computer.
This can be done by adding a small entry to the Windows registry which acts as a switch that can be enabled to make use of the write protection or disabled to allow write access. Just follow these steps:
1. Open the Registry Editor (Open the “Run” dialog box, type regedit and hit “Enter”).
2. Navigate to the following Registry key:
HKEY_LOCAL_MACHINE\SYSTEM\CurrentControlSet\Control\
3. Create a New Key named as StorageDevicePolicies. To do this right-click on Control, and click on New->Key and name it as StorageDevicePolicies.
4. Now right-click on StorageDevicePolicies and create a New->DWORD (32-bit) Value and name it as WriteProtect.
5. Double-click on WriteProtect and set the Value data to 1.
Now the right-protection for USB drives is enabled on your computer (no restart required) and thus it would not be possible for anyone or any program to add/delete the contents from your USB flash drive. Any attempt to copy or download the files onto the USB drive will result in the following error message being displayed.
To revert and remove the write-protection, all you need to do is just change the Value data for WriteProtect (Step-5) from 1 back to 0. Now write access to all the USB devices is re-enabled.
Sometimes it may seem difficult to remember and follow the above mentioned steps each time you want to enable/disable the write protection. Hence as an alternative way, there are many tools available to automatically enable/disable the write-protection feature. One of my favorite tool is USB Write Protect by Naresh Manadhar. Using this tool you can limit write access to your USB drives with just a click of a button.

How to Recover Deleted Files from Windows and Mac


Have you accidentally deleted your files from the Hard disk? Do you desperately want to recover them back? Well you need not panic! It is possible to recover the deleted files back from the hard disk (even after you have Shift+Deleted) provided you act as soon as you realize that the files are deleted and use the best deleted files recovery software. In this post you will find a detailed information on how to recover the deleted files from your Windows PC or Mac.
Today there exists hundreds of data recovery tools and softwares on the market which boast to recover 100% of all the deleted files back in the original condition. But in reality most of these softwares are neither effective nor capable of recovering your files back. So it is very much necessary to make the right choice of the file recovery software in order to recover deleted files back in the original condition. We recommend the following softwares to recover the deleted files
1. Stellar Phoenix Data Recovery (for Windows)
2. Stellar Phoenix Mac Data Recovery (for Mac)
Stellar Phoenix is one of the best company specializing in deleted files recovery services and solutions since 1993. Stellar’s Data Recovery Solutions encompasses a wide range of software for almost any data loss situation ranging from accidental formats to virus attacks to software malfunctions. Hence Stellar provides the best tools to recover deleted files with over 1,000,000 satisfied customers across 137 countries.
How the File Deletion Process Works?
When you delete a file from your computer (or even from the recycle bin) the file is not actually deleted. Unlike what most people think, the file is not permanantly deleted or dropped from your hard disk. Let’s take an example of a book containing 50 pages. Suppose when you delete the page 25, assume that only the entry in the index which points to the page 25 is deleted and not actually the page 25 itself. Likewise when you delete a file from your hard disk, only the pointer which points to this file is removed and not actually the file itself. This file still exists intact and is 100% possible to recover it back in the original condition. In this condition the file becomes invisible and hence appears to have deleted.
What are the Chances of Recovering my Files Back?
Since the operating system doesn’t immediately re-use the space from the deleted files, it is most certainly possible to recover the deleted files back in 100% original condition. It may take up a very long time for those files to be completely deleted since the modern hard disks have ample capacity. Hence the chances are too less that the space from the deleted files are re-used immediately. So, it is really worth to try out the file recovery softwares like Stellar Data Recovery for Windows or Stellar Data Recover for Mac. Some files are reported to have recovered even after years of it’s deletion. However for the best results, it is recommended that you use the file recovery software as immediately as possible to recover your files.
Recovering the Deleted Files
In order to recover the deleted files all you need to do is perform a scan (search) for the deleted files using a File Recovery Software. Please be informed that there is no manual way to recover the deleted files. The Phoenix Data Recovery software performs a thorough scanning of the hard disk sector by sector and will locate the existence of deleted files to restore them back in the original condition. It is the only software that supports 185 popular file types including Windows NT Registry, JPEG, MP4, GIF, BMP and MS Word files. The software offers rich graphical support and incorporates advanced scanning methods to completely scan and recover deleted files from your hard drive. With this you can
Recover FAT16, FAT32, VFAT, NTFS, and NTFS5 file system partitions
Recover deleted emails
Recover deleted documents
Recover deleted photos
Recover deleted music
Formatted Hard-Drive recovery
Recover files from USB Drives, CDs, DVDs and memory cards
Recover almost all the camera format files
Visit the following links for more information on Stellar Data Recovery
1. Stellar Phoenix Data Recovery (for Windows)
2. Stellar Phoenix Mac Data Recovery (for Mac)

Windows SEND TO MENU |||| Simply Change XP Start Button Name


Windows SEND TO MENU
How often do you copy songs from a CD? Or some photos from a CD?
What do you do? You select the required files and do a CTRL –C. Open the destination folder and do a CTRL-V. Here is something you can benefit time from. Customize your SEND TO MENU.
This sounds simple and you can do it in less than sixty seconds.
You can create your own BASKET.
First you’ll need access to hidden files. So change your view settings to make all hidden files visible.
Tools -> folder options -> view (tab) and select the show hidden files and folders.
go to parent drive:/documents and settings/(user name)/send to
Open up my computer and locate your most used folders.
Create a shortcut of the most used folders in SEND TO FOLDER.You can do this in a number of ways.
Right click -> send to desktop(create shortcut) and move the shortcut from the desktop to the SEND TO FOLDER
Copy the most used folder and go to SEND TO FOLDER and right click -> paste shortcut.
Also remember to rename the shortcuts to send to videos or send to potos. We don’t need confusion when we use the same later.
5. DONE.
Simply Change XP Start Button Name
I’ve read a number of articles on the internet about changing the text on the Start button in XP. On more than one occasion I’ve seen references to a five (5) letter limitation when the button is renamed. I always wondered if this was true or just an assumption someone made because the default ‘start’ just happened to fit the button size. So, I decided to run a test and see if there really was a five character limit.
First of all just u need to do is download Resource hacker.
Resource HackerTM is a freeware utility to view, modify, rename, add, delete and extract resources in 32bit Windows executables and resource files (*.res). It incorporates an internal resource script compiler and decompiler and works on Win95, Win98, WinME, WinNT, Win2000 and WinXP operating systems.

Customize Start Menu Button in Windows 7


Have you ever wondered how to customize the start menu button in Windows 7? Well it is possible to spice up your copy of Windows 7 by giving a new look to the start menu button. Here is a detailed tutorial on how to do it. The following images shows a preview of how your start menu would look like before and after the customization process is done.
Default Start Menu Button
Customized Start Menu Button
Tools That You Need:
1. Resource Hacker
2. Custom Start Menu icons (images). It mush be of the size 54×162 with a .bmp extension. which looks something as follows
They must be in the following order:
1st Image – When the button is not in use
2nd Image – When the mouse pointer is over the button
3rd Image – When the button is clicked
I have created a few customized buttons which are ready to use. You can download them from the following link.
Start Menu Buttons Download
Once you have all those resources ready, you can start the customization process as follows…
1. Take the ownership of the file “explorer.exe“ which is located in the Windows Folder (Most likely in C:\Windows).
2. Open the Resource Hacker Tool.
3. Go to File menu and click on Open. Now load the file “explorer.exe” into the Resource Hacker.
4. Expand Bitmap branch in the left pane.
5. Now expand 6801 option, right-click on 1033 and select Replace Resource option.
6. A new window appears. Click on Open file with new bitmap button.
7. Navigate to the customized (.bmp) image, open it and click on Replace button.
8. Repeat steps 4 to 7 above for the options 6805 and 6809 as well.
9. Now click on Save option (File->Save). Resource Hacker will automatically create a backup file called explorer_original.exe so that you can restore it in the future if needed.
10. Log Off and Log On to see the changes in effect.
NOTE: If you are running 64-bit edition of Windows 7, then you need to use Resource Hacker version 3.5.2 beta which is 64-bit compatible. It is available from the same link provided above.
I hope you enjoy this trick. Pass your comments and share your experience.

How to disable search history display in Windows 7


Windows 7 automatically saves all the recent searches done by the users. Some people are annoyed by this feature as the last three searches become visible under the search box as you start typing in it. If the computer is shared by others, you might not want others to see your past searches. There is a way in which you can disable search history display in Windows 7. However, you cannot disable search history display in Windows 7 Home editions. This is due to the fact that you need to utilize the Group Policy Editor for achieving this goal and it is not available in the Home versions. Follow these steps to disable search history display in Windows 7:

Enter gpedit.msc in the search box of the Start menu. Press Enter. This will open the Local Group Policy Editor.


Scroll down to User Configuration \ Administrative Templates \ Windows Components \ Windows Explorer.
Double-click on Turn off display of recent search entries in the Windows Explorer search box on the right hand side of the dialog box.
Select Enabled and click on the Apply button.
Click on the OK button.
Close out of the Group Policy Editor.
From now on, you won't be bothered by the display of recent search history as you start typing into the search box.

How to create a shortcut for locking the Computer Screen in Windows 7


There are many ways in which you can lock the computer screen. The most popular as well as the fastest way to lock it is to use a keyboard shortcut. The keyboard shortcut used to lock the computer screen is Win+L. A few of us choose to utilize the mouse to lock it. And of course many people like to use both the options.
There is another method in which we can lock the computer screen. It is to create a shortcut for locking the computer screen in Windows 7. You can create a shortcut for locking the computer screen in Windows 7, XP and Vista too. Follow these steps in order to create a shortcut for locking the computer screen in Windows 7 as well as other editions:
Right-click on the desktop where you would like to create the shortcut.
Point to New.
Click on Shortcut from the menu.

Type in this text in the shortcut textbox. (This text will work for Windows XP as well even though the screen will be different)
rundll32.exe user32.dll, LockWorkStation

Click on the Next button.
Type in a name for your shortcut.
Click on the Finish button.  
You have successfully created a shortcut to lock your workstation. Just click on the shortcut whenever you want to lock the computer screen.

How to Burn a Data CD or Data DVD in Windows 7 Using Media Player


You can burn a data CD or data DVD in Windows 7 using Media Player. An audio CD can contain just approximately eight minutes of music. On the other hand, if you burn a data CD or data DVD in Windows 7 using Media Player, it will be able to hold numerous hours of music. Video files and pictures can also be added to the data discs.
Advantages
 When you burn a data CD or data DVD in Windows 7, the Windows Media Player does not transform the selected files to a different format prior to saving them to a blank data disc, so the files stay in the compressed condition. This allows you to put much more items on a single disc.
 As the format of the files is not changed, the quality of the files remains the same. 
You can burn a data CD or data DVD in Windows 7 using Media Player as follows:
  •  Click Start.
  •  Click All Programs.
  •  Select Windows Media Player.
  •  Click the Burn tab in the Player Library.
  • Click Burn options and select Data DVD or CD.
  •  Insert a blank disc into the CD or DVD burner of your computer.
  • Close the AutoPlay dialog box if it comes into sight.
  •  Some people have more than one CD drive in their computer. If you have multiple CD drives in your computer too, select the one you would like to use in the navigation window.
  •  Look for the songs you want to burn.
  •  In order to make your burn list, drag the songs from the details pane in the center of the Player Library to the list pane which is on its right side.
  •  You can also change the order of the items in the burn list by dragging them upward or downward in the list. 
  •  To remove a song from your list, simply right-click on the item and click on Remove from list.
  •  After you finish making your list, click upon Start burn.
It can take a while to burn a data disc. If your selected items cannot fit in one disc, you also have the choice of burning the rest of the items to a different disc. A data DVD is not the same as a DVD-Video disc e.g. the movie DVD you buy or rent from the store. 

How to Access Hidden Themes in Windows 7


Windows 7 offers a good assortment of themes to customize the feel as well as the look of your computer. Windows 7 features particular themes which are based on the location and the language you select while you install the Windows 7. You can look for the location-specific theme in the Personalize menu. You just have to right-click at any place upon your computer desktop. You will be able to get the couple of themes according to your location.

Other than the location specific themes which you get by default, you can access hidden themes in Windows 7 which are offered to other regions. So the default themes which you get according to your region are not the only themes you can use. It is possible to access hidden themes in Windows 7 very easily in your system. This is what you have to do:
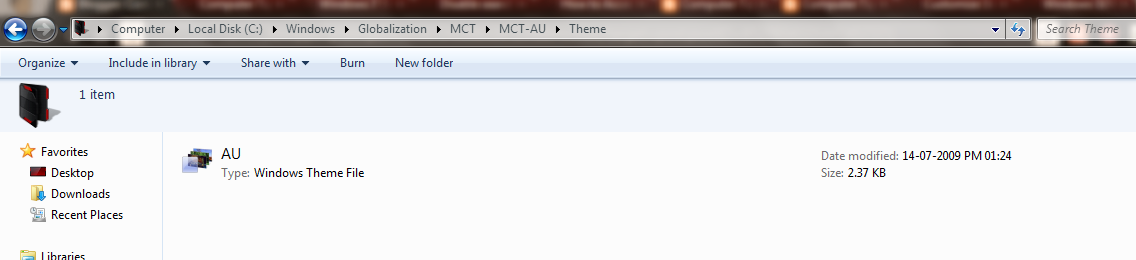
 Click on Computer 
 And type " C:\Windows\Globalization\MCT " in the title bar.

Your Windows Explorer will show you a window with additional themes. These will be from Great Britain, South Africa, Australia and Canada.
You have the option to select the wallpaper only or you can install the whole theme if you want.

You will be able to install the entire brand-new theme by double clicking on the required file.

The new theme you add will show under “My Themes” within the “Personalization” pane.


You can also download many themes for Windows 7 from different website including the Microsoft official website. But you should first try to customize and access hidden themes in Windows 7 as you might not feel the need to download additional themes from elsewhere after that.. 

Change the windows default identity


In windows XP, you can change the windows default identity (Computer Manufacturer Logo and other information’s) and share your own private identity there. First you right click on My Computer then click on Properties, here may be you will see computer manufacture logo or empty area. So add your own logo there to make your computer more private.
Follow the given steps to change the system default Properties identity:
First click on Start button and type notepad in Run option then press Enter.
Now type the following text in notepad.
[General]
Model=” Computer Tips and Tricks!”
[Support Information]
Line1=”We offer various help topics including A to Z Computer Free Tips and Help.”
Line2=”Visit daily for new tips  http://computer-trics.blogspot.com ”
There are some standard keywords, for example Manufacturer, Model, Line 1, Line 2; you can not change these keywords. Now save this notepad file in c:/windows/system32 folder with file name, OEMINFO.INI.
Now choose your favorite picture to set as logo, using any picture editor resize the picture size approx. 150X150 pixels then save it in c:/windows/system32 folder with file name OEMLOGO.BMP.
Now close the all files and restart your computer after any changes to go into effect. To verify these changes, right click on My Computer and open Properties.
Under General tab, verify the system properties with new settings.

Tuesday, January 17, 2012

Take Ownership of Files and Folders in Windows 7 – An Easy Way


If you are a Windows 7 user, then you are most likely be aware of the fact that you need to TAKE OWNERSHIP of files and folders before you can make any changes to them. This feature was introduced in order to prevent any unauthorized changes from being made to the system files. However it can be little annoying to follow a long list of procedure every time you want to take ownership of a certain file or folder. So to make this job simpler, I have found a nice tool called Take Ownership Shell Extension which adds the “Take Ownership” option to the Windows context menu. This makes taking ownership too simple and requires no more than a click.
Just run the portable tool kit and click on the “Install” button. This will add the “Take Ownership” option onto the context menu. To take ownership all you need to do is, just right-click on any of the desired file or folder and click the option “Take Ownership“.
In case if you wish to uninstall this tool at any time, you can just run the tool again and click on the ”Uninstall” button. I hope you like this tool. This works on both Windows 7 and Windows Vista. You can download it from the following link.

Change the Logon Screen Background in Windows 7


How would you like to change the logon screen background in Windows 7 so as to give your Windows a customized look and feel? With a small tweak it is possible to customize the Windows 7 logon screen and set your own picture/wallpaper as the background. Changing logon screen background in Windows 7 is as simple as changing your desktop wallpaper. Well here is a step by step instruction to customize the logon screen background.
1. The image you need to set as the background should be a .jpg file and it’s size should not exceed 245KB.
2. The image resolution can be anything of your choice. However I prefer 1440 x 900 or 1024 x 768. You can use any of the photo editing software such as Photoshop to compress and set the resolution for your image. Once you’re done, save this image as backgroundDefault.jpg.
3. You will need to copy this image to
C:\Windows\system32\oobe\info\backgrounds
You will need to create that path if it does not already exist on your computer.
4. Now open the Registry Editor (Start -> Run -> Type regedit) and navigate to the following key
HKLM\Software\Microsoft\Windows\CurrentVersion\Authentication\
LogonUI\Background
If Background does not exist rightclick LogonUI, select New and then Key, and then name it Background. Now locate OEMBackground (listed on the right side). If it does not exist, right-click Background and select New and then DWORD and name it OEMBackground.
5. Double-click on OEMBackground and set the Value Data to 1.
6. Now log-off to see the new logon screen background. If you would like to revert back to the default background, just set the Value Data back to 0.

Forgot Windows XP Password ?


Yes it is possible to change Adminstrator password both in Win XP and Vista without knowing it. If you somehow manage to login as an Administrator then you can change the password without knowing it.
Here’s the Step-By-Step instructions
1. Right-click on the “My Computer” icon on the desktop OR in the Start Menu.
2. Select the option “Manage”.
3. On the left pane expand the “Computer Management (Local) tree (if it is not already expanded)
4. Double click “Local Users and Groups” option From “System Tools” tree.
5. Click the “Users” option.
6. Now you will see the list of users on the right side pane, such as Administrator, Guest etc.
7. Right click the “Administrator” and select the option “Set Password” option.
8. Now you will see a warning message, Click on proceed.
9. Now the system asks you for “New Password” and “Confirm Password” .
10. After entering the password click on “OK”. The password is changed. That’s It!

How Windows Product Activation (WPA) Works?


Windows Product Activation or WPA is a license validation procedure introduced by Microsoft Corporation in all versions of it’s Windows operating system. WPA was first introduced in Windows XP and continues to exist in Windows Server 2003, Windows Vista, Windows Server 2008 and Windows 7 as well. WPA enforces each end user to activate their copy of Windows so as to prevent unauthorized usage beyond the specific period of time until it is verified as genuine by Microsoft. How WPA really works was a closely guarded secret until GmbH analyzed WPA using a copy of Windows XP RC1 and published a paper on their findings.
In this post you will find answers to some of the most frequently asked questions about Windows Product Activation.
Why activation?
Microsoft’s intention behind the activation is to limit the usage of it’s Windows operating system to only one machine for which the retail license is issued. Any other computer which runs on the same license must be disallowed from using the software. Thus WPA demands for activation of the product within 30 days of it’s installation so as to ensure that it is genuine.
What does “Genuine Windows” means?
The copy of Windows is said to be genuine only if the product key used during the installation is genuine. It means that a given product key (retail license) must be used to install Windows only on one computer for which the license was purchased. Thus if the same key is used for the installation on another computer, then it is said to be a pirated copy.
Exactly what information is transmitted during the activation?
When you activate your copy of Windows you are transmitting an Installation ID code to the Microsoft either by phone or Internet depending on the method you choose to activate. Based on this, the Microsoft’s licensing system can determine whether or not the installed OS is genuine. If it is said to be genuine, then the system will receive the Activation ID which completes the activation process. If the activation is done via telephone then the Activation ID needs to be entered manually to complete the activation process.
What information does the Installation ID contain?
This Installation ID is a 50-digit number which is derived from the following two data.
1. Product ID – It is actually derived from the 25-digit product key (the alphanumeric value that is printed on the sticker over the Windows CD/DVD case) that is entered during the installation of the operating system. The Product ID is used to uniquely identify your copy of Windows.
2. Hardware ID – This value is derived based on the hardware configuration of your computer.
The WPA system checks the following 10 categories of the computer hardware to derive the Hardware ID:
Display Adapter
SCSI Adapter
IDE Adapter (effectively the motherboard)
Network Adapter (NIC) and its MAC Address
RAM Amount Range (i.e., 0-64mb, 64-128mb, etc.)
Processor Type
Processor Serial Number
Hard Drive Device
Hard Drive Volume Serial Number (VSN)
CD-ROM / CD-RW / DVD-ROM
Thus the Installation ID which is a combination of Product ID and Hardware ID is finally derived and sent to Microsoft during the activation process.
How is the Installation ID validated?
The Installation ID needs to be validated to confirm the authenticity of the installed copy of Windows. So after the Installation ID is received by Microsoft, it is decoded back so as to obtain the actual product key and the hardware details of the computer involved in the activation process.
The Microsoft’s system will now look to see if this is the first time the product key is being used for the activation. This happens when the user is trying to activate his Windows for the first time after purchase. If this is the case then the Installation ID is validated and the corresponding Activation ID is issued which completes the activation process.
However Microsoft system will now associate this product key with the hardware ID of the computer and stores this information on their servers. In simple words, during the first use of the product key, it is paired together with the Hardware ID and this information is stored up on the Microsoft servers.
What if a computer running a pirated copy of Windows attempts to activate?
The activation fails whenever the copy of Windows installed is not said to be genuine. This usually happens when the product key used for the installation is said to have been used earlier on a different computer. This is determined during the activation process as follows:
During the validation of the Installation ID, the Microsoft’s system checks to see if the same product key was used in any of the previous activation processes. If yes then it looks to see the Hardware ID associated with it. The computer running a pirated copy of Windows will obviously have a different hardware configuration and hence the Hardware ID will mismatch. In this case the activation process will fail.
Thus for a successful activation, either of the following two cases must be satisfied:
The product key must have been used for the first time. ie: The product key should not have been used for earlier activations on any other computer.
If the product key is said to have been used earlier, then the Hardware ID should match. This happens only if the same computer for which the license was genuinely purchased is attempting for subsequent activation.
What about formatting the hard disk?
Each time the hard disk is reformatted and Windows is re-installed, it needs to be re-activated. However the activation process will be completed smoothly since the same computer is attempting for subsequent activation. In this case both the product key and the Hardware ID will match and hence the activation becomes successful.
What is I upgrade or make changes to my hardware?
In the above mentioned 10 categories of hardware, at least 7 should be the same. Thus you are allowed to make changes to not more than 3 categories of hardware. If you make too many changes then your activation will fail. In this case, it is necessary to contact the customer service representative via phone and explain about your problem. If he is convinced he may re-issue a new product key for your computer using which you can re-activate your Windows.
Some things WPA does not do
WPA does not send any personal information at all about you to Microsoft. There is still an option to register the product with Microsoft, but that is separate and entirely voluntary.
If you prefer to activate via phone, you are not required to give any personal information to Microsoft.
WPA does not provide a means for Microsoft to turn off your machine or damage your data/hardware. (Nor do they even have access to your data). This is a common myth that many people have about Microsoft products.
WPA is not a “lease” system requiring more payments after two years or any other period. You may use the product as licensed in perpetuity.
I have tried my best to uncover the secret behind the WPA. For further details and more technical information you can read the actual paper by Fully Licensed GmbH athttp://www.licenturion.com/xp/fully-licensed-wpa.txt. I hope you like this post. Pass your comments.